Teachers' Domain - Digital Media for the Classroom and Professional Development
User: Preview
Fiber Optics
(Lesson Plan)
The Light Stuff
(Interactive)
Refraction of Light Demonstration
(Interactive)
 Loading Standards
Refraction is an important behavior of light that can be used to explain the operation of lenses, prisms, and optical fiber, as well as natural phenomena such as rainbows and mirages. The index of refraction, or refractive index, is defined as the ratio of the speed of light in a vacuum to the speed of light in a material. The index of refraction is an important property of optical materials and one that can be easily measured in the laboratory.
This lesson begins with a video that introduces the concept of refraction. Students learn firsthand how when a wave of light travels from one medium to another, the change in the wave's speed leads to a change in its wavelength and the bending of the wave. Next, students investigate index of refraction through an interactive media asset, research, and a class discussion. Following a video about the index of refraction and Snell's law, students work in groups to conduct their own laboratory experiment to measure the index of refraction of gelatin (or plastic).
Note: This is the first of two optics lesson plans. You may want to follow this lesson with the Fiber Optics Lesson Plan.
Computers with Internet connection
Masking tape
Measuring the Index of Refraction Activity Document
For each group:
1. Introduce the lesson by showing the Observing Refraction of Light Video. Stop the video before it explains Fermat's principle of least time. Ask students to give examples of reflection and refraction of light from their everyday experiences. Students often believe that reflection occurs only from shiny surfaces; remind them that most of the objects they see are visible because of reflected ambient light.
2. Ask students to try to explain in their own words why light waves bend when they enter a new material.
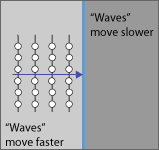
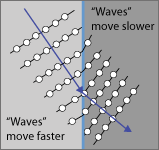
3. Have students demonstrate the behavior of light at a boundary between two materials by having them act out a "people wave." This illustrates how the changing speed and wavelength of a wave causes it to refract at the boundary.


4. Discuss the concept of index of refraction. Remind students that a high index of refraction means a low light speed. Light is slowed in a material due to interactions between the electric field of the light wave and the atoms that make up the material. Be sure that they understand the meaning of the index of refraction value. Have students explore The Light Stuff Interactive on their own or in pairs.
5. In small groups, have students research the index of refraction for a variety of common materials including air, plastic (acrylic), and water. Ask each group to find the values for 5 to 6 items, and use these to create a combined table for the class.
TIP: This is a good time to discuss Internet research and how students can judge the accuracy of the data they find online: finding the same values from several different sources is a good indication that the values are correct. Students should also note if the source provides the wavelength at which the measurement was made. The index of refraction will vary somewhat at different wavelengths.
6. Lead students in a discussion about the index of refraction values that they found.
7. The index of refraction of a material can be determined by measuring the refractive angle for different incident angles. Have students watch the The Index of Refraction and Snell’s Law Video. Ask students to pay particular attention to how the angles are measured. The angles of incidence and refraction are always measured from the normal line to the incident or refracted ray.
8. Have students work in small groups to conduct their own experiments to determine the index of refraction of a piece of plastic or gelatin. For each group, provide the Measuring the Index of Refraction Activity Document worksheet and the materials that will be needed.
TIP: If students are not ready for the calculation with Snell's law, they can gain important conceptual knowledge by observing the relative sizes of the incident and refracted angles.
9. Ask students to describe what happens when light travels from plastic or gelatin into air. Is the refracted angle (in air) larger or smaller than the incident angle (in plastic or gelatin)?
Ask students to explain what happens when horizontal beams of light pass through various lens shapes. If plastic refraction shapes are not available to check answers, the shapes may be cut out of gelatin. Alternatively, students may explore the Refraction of Light Demonstration Interactive
TIP: To cut curved surfaces in gelatin, use a cookie cutter or a strip cut from a plastic folder that you bend into a curve. Push straight down firmly for the cleanest edge.

 Teachers' Domain is proud to be a Pathways portal to the National Science Digital Library.
